
When working on an AWS Terraform project, especially a complex one you developed over time, you might run into a few issues, in particular, with the state:
- Your blast radius is too big, now changes do your RDS instance can potentially impact your network configuration.
- The state file is too big, and reviewing changes are too complex or too dangerous!
- Your team is bad at managing Terraform state, and tend to clump everything into one state file.
It’s wise to plan your Terraform project up-front, or at least have a strategy for managing it going forward. Using a tool like Terragrunt can help alleviate some of this pressure, but, it’s also got drawbacks. So let’s take a look.
Managing state
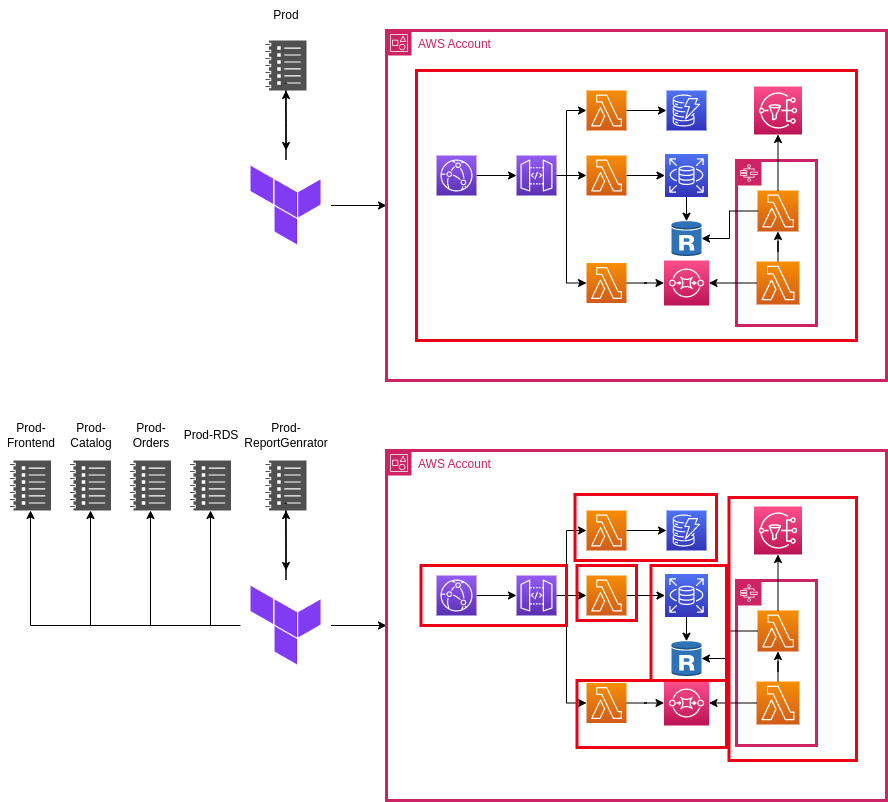
Splitting the Terraform state is something you might do already if you deploy to multiple environments. In many cases though, you’ll have different workloads in the same AWS account and those should technically be separated.
Some people swear by monolithic state, but despite Terraform’s stability improvements, it’s still a bad idea in my opinion. I have been on several projects with large states and have run into one of the following, or sometimes both issues, The Terraform State:
- Manages non-prod and prod workloads, people are hesitant to make infrastructure changes because there is a chance it could impact production.
- Is so ginormous that it times out or exceeds the output on GitHub Actions for example.
- Has bad resources somewhere in there that cause the state to take a very long time to load, or act a bit… funky…
- Someone has modified the Terraform state (oh no!!!) and now we have to revert and reconcile it. Oh dear!
Splitting state by environment
You should be doing this at the very minimum. Production, Stage and Non-Production environments should be separated into different states so you can’t muck up production by pushing a bundy change to non-production!
My advice is to split state up by environment. You should have a state file for production and a separate state file for non-production. Additionally, you should review your infrastructure, and if it’s particularly sensitive (e.g. backups or networking), then maybe it makes sense to deploy it as part of a different state.
Splitting by component
This is the bread and butter of Terragrunt, while this isn’t as necessary today, you may find it helpful for very sensitive environments.
Splitting by component involves creating a seperate Terraform Project per component like so:
environment
 └ vpc
     └ main.tf
     └ outputs.tf
     └ variables.tf
     └ backend.tf
     └ provider.tf
 └ application
     └ pipeline
         └ codepipeline.tf
         └ codebuild.tf
         └ outputs.tf
         └ variables.tf
         └ backend.tf
         └ provider.tf
     └ app
         └ lambda.tf
         └ outputs.tf
         └ variables.tf
         └ backend.tf
         └ provider.tf
     └ data
         └ dynamodb
             └ dynamo.tf
             └ outputs.tf
             └ variables.tf
             └ backend.tf
             └ provider.tf
         └ events
             └ sqs.tf
             └ eventbridge.tf
             └ outputs.tf
             └ variables.tf
             └ backend.tf
             └ provider.tf
By splitting state by component, we ensure that each one of our services is configured via a different backend, which limits the blast radius, about as much as it can be.
The ideal spot – hybrid
You should ideally split your state in a hybrid approach. When you deploy AWS services it’s probably as part of a particular application or platform, or has a certain use-case such as shared networking. Split the state by each of these domains so each one of these can not only be managed independently, but there is less risk when making changes.
Introducing Terragrunt
Terragrunt isn’t a replacement for Terraform, it’s a wrapper around it, well it was, until the BCL :(. You can use the Terragrunt tool to execute your Terraform code for you. It will dynamically generate some of the code for you so you can easily split up your state in your mono repo. You can also run hooks, that will allow you to inject actions into your Terraform run.
Practical Example
Our manager has just reached out to us to setup a new AWS environment, as the company has opted to migrate to AWS. So, we’ve got the difficult job of writing the Terraform to deploy the required resources in AWS in a safe manner for the long-term. We’ve opted to use Terragrunt because it can help us to split our state without causing us too much grief.
We’ve decided to use the following structure for our code:
accounts
 └ test
   terragrunt.hcl
     └ vpc
         └ main.tf
         └ terragrunt.hcl
     └ jumphost
         └ main.tf
         └ terragrunt.hcl
modules
  └ networking
    └ vpc
         └ <module_files>
    └ jumphost
         └ <module_files>
What will this do for us?
- A root terragrunt.hcl file exists that defines our core provider, our IAM role we’ll use to authenticate into our account, and our backend.
- Our Terraform configuration will be split by account.
- Each account will have sub-modules with their own terragrunt.hcl file and their own state file configured in the S3 backend.
- A centralised modules directory to put our generic modules we can use across all accounts.
Writing Terragrunt
Let’s write our root Terragrunt file.
# accounts/test/terragrunt.hcl
generate "provider" {
    path = "provider.tf"
    if_exists = "overwrite_terragrunt"
    contents = <<EOF
provider "aws" {
    region = "ap-southeast-2"
    assume_role {
        role_arn = "arn:aws:iam::${get_aws_account_id()}:role/tf-role"
    }
}
EOF
}

remote_state {
    backend = "s3"
    generate = {
        path = "backend.tf"
        if_exists = "overwrite_terragrunt"
    }
    config = {
        bucket = "tfstate-storage-${get_aws_account_id()}"
        key = "${path_relative_to_include()}.tfstate"
        region = "ap-southeast-2"
        encrypt = true
        dynamodb_table = "tfstate-lock"
    }
}
Our code is telling Terragrunt to do a few things when we run it:
- Generate a provider.tf file in each path containing a terragrunt.hcl file that we initialise.
- The generated provider file will define our authentication mechanism to AWS, it will use the get_aws_account() function to retrieve the AWS account that we are authenticated with.
- Generate a backend.tf file in each path containing a terragrunt.hcl file that we initialise.
- The backend will be set to S3 in our bucket, we’ll use a different S3 bucket for each account we initialise, using that same get_aws_account() function.
- Terragrunt will configure the state file key itself to be different depending on our path name of our Terraform.
Let’s write some Terragrunt for our submodules:
# accounts/test/vpc/terragrunt.hcl

include "root" {
    path = find_in_parent_folders()
}

inputs = {
    trusted_hosts = {
        rdp = ["xx.xx.xx.xx/32"]
        ssh = ["xx.xx.xx.xx/32"]
    }
    vpc_config = {
        name = "test-vpc"
        cidr_block = "172.16.0.0/16"
    }
}
# accounts/test/jumphost/terragrunt.hcl
include "root" {
path = find_in_parent_folders()
}
dependency "vpc" {
config_path = "../vpc"
}
inputs = {
ssh_key = "ssh-rsa ..."
subnet_id = dependency.vpc.outputs.public_subnets["ap-southeast-2a"].id
security_group_ids = [
dependency.vpc.outputs.security_groups["allow_internet_access"],
dependency.vpc.outputs.security_groups["allow_ssh_from_trusted_hosts"]
]
}Our code tells Terragrunt to look up our directory tree for another terragrunt.hcl file it can inherit. Unfortunately, at this time, a Terragrunt configuration file can only inherit one file, so you can’t inherit a file that inherits a file. We’re also passing our desired configuration values for our module to Terragrunt.
We could also add specific input parameters to our root file, allowing us to inherit values across our whole account.
Writing Terraform
Now we can create our standard Terraform files as per usual:
# accounts/test/vpc/main.tf

variable "trusted_hosts" {type = map(list(string))}
variable "vpc_config" {type = map(string)}

module "vpc" {
    source = "../../../modules/networking/vpc"
    trusted_hosts = var.trusted_hosts
    vpc_config = var.vpc_config
}

output "vpc_id" {value = module.networking.vpc_id}
output "public_subnets" {value = module.networking.public_subnets}
output "private_subnets" {value = module.networking.private_subnets}
output "security_groups" {value = module.networking.security_groups}
#accounts/test/jumphost/main.tf
variable "ssh_key" {type = string}
variable "subnet_id" {type = string}
variable "security_group_ids" {type = list(string)}
module "jumphost" {
source = "../../../modules/networking/jumphost"
ssh_key = var.ssh_key
subnet_id = var.subnet_id
security_group_ids = var.security_group_ids
}
output "jumphost_hostname" {value = module.jumphost.jumphost_hostname}
output "jumphost_id" {value = module.jumphost.jumphost_id}
output "jumphost_public_ip_address" {value = module.jumphost.jumphost_public_ip_address}As you can see, we can just define our Terraform modules like usual. No special configuration needed!
Deploying our Infrastructure
Terragrunt allows us to deploy multiple components at once, but it’s advisable not to do this and instead deploy your stacks in order. So, let’s do that.
michael@device~ cd accounts/test/vpc
michael@device~ terragrunt init # wait for terragrunt to initialise the module.
michael@device~ terragrunt plan # Confirm you're happy with the plan, if so then...
michael@device~ terragrunt apply #Apply the changes! (Ooooh Spooky)

michael@device~ cd accounts/test/jumphost
michael@device~ terragrunt init # initialise it... again... -_-
michael@device~ terragrunt plan # If you don't get an error it's *probably* fine
michael@device~ terragrunt apply # Apply these changes too!
Now, we’ve successfully applied our infrastructure using Terragrunt. Congratulations!
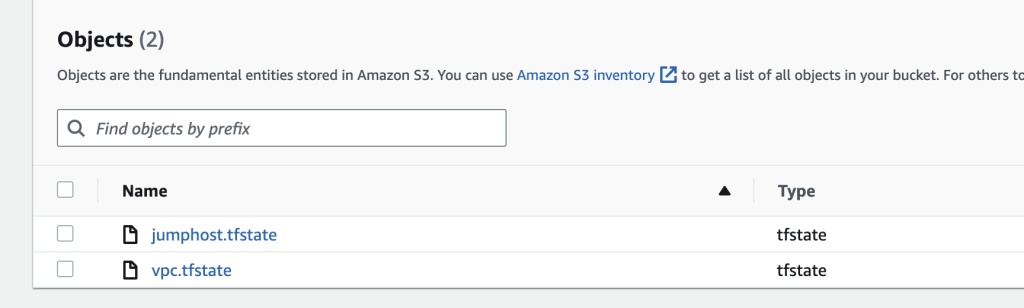
If we check the S3 bucket our Terraform State is using, we should see the state keys in there.
Final Notes
Even though I wrote this article at a time when Terragrunt was popular, and now, well, it’s not so recommended anymore. It’s still a cool concept and tool that I found very inspiring for future tooling I’d build internally at my company.
Leave a Reply