
Everyone loves GitHub Actions. It’s super easy to use, it’s easy to extend, tons of people have written easy-to-use extensions for it. There’s just one problem…
How can we deploy to AWS securely using another CI/CD platform? Well, fortunately, that problem has been solved using OIDC.
Understanding OIDC
Why static credentials suck
Static credentials used to be normal back in the day, but they totally suck! They’re a big security risk because these days, you can easily scrape many systems at once, misplace credentials and with all of the important stuff we store and run in AWS, someone having unauthorised access to your environment is a big no no.
Here’s how we had to set-up CI/CD platforms like GitHub if we wanted to deploy to AWS in the past:
- Provision an IAM User and attach a policy to it with the required deployment permissions.
- Generate a set of IAM Credentials (access/secret keys) for the new user.
- Pass the static credentials to the GitHub runner using secrets.
- GitHub can now authenticate to AWS.
As raised above, though, static credentials do put your environment at risk. These days, it’s easier than ever to mis-manage your credentials, and even easier to scrape for exposed credentials.
To highlight this fact, Palo Alto have published an article on the anatomy of a supply chain attack, illustrating why this risk should be taken so seriously.
How OIDC works
Before explaining how OIDC works, it’s important to know that OIDC is not free of credentials, but, it establishes a trust between GitHub and your AWS environment so that GitHub has permission to request role credentials (if your policy allows), which will pass temporary IAM credentials to the GitHub Actions Runner. If an unauthorised third-party somehow extracted the credentials from your runner, they wouldn’t be able to use them for very long!
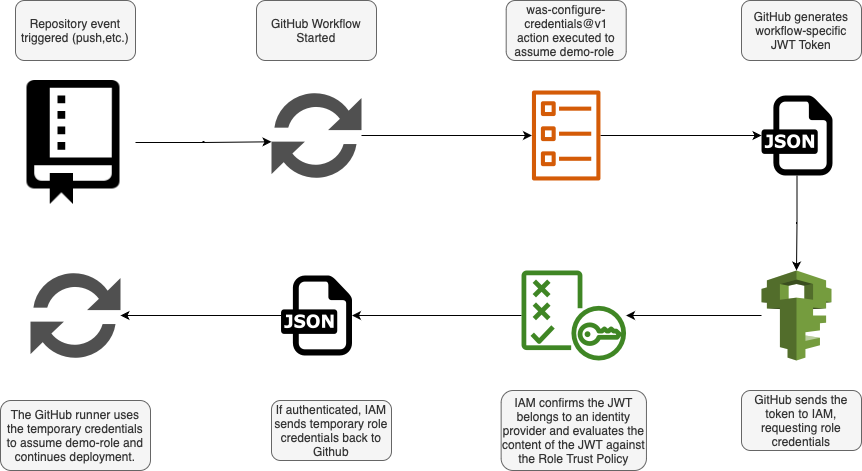
As per the diagram above, the process of authenticating to AWS via OIDC from a GitHub runner is as follows:
- You have specified the AWS-configure-credentials action in your Actions Workflow.
- This action sends a JWT Token to AWS STS containing information about the repository, environment, trigger, etc. along, passing along GitHub’s cryptographic identity.
- AWS STS confirms the sender of the token matches the thumbprint (cryptographic identity) of GitHub to ensure the request hasn’t been tampered with and comes from GitHub itself.
- AWS STS compares the IAM Trust Policy of the role the action is trying to assume with the contents of the JWT Token and ensures the trust policy allows the repository, branch, environment, etc.
- If the IAM Trust Policy allows the action to assume the role, then AWS STS will return temporary IAM Role Credentials to the GitHub Action, allowing it to authenticate with AWS.
Remember that by adding GitHub as an identity provider in AWS won’t allow GitHub to assume just any role in your account, that role has to be configured explicitly with a special type of trust policy that allows GitHub to assume the role under certain conditions (passed in the JWT).
You should always refer to the GitHub Documentation though to be sure.
Setting up OIDC
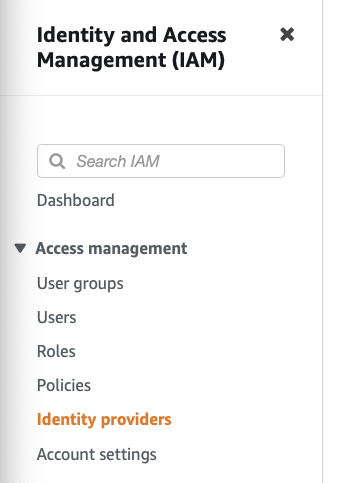
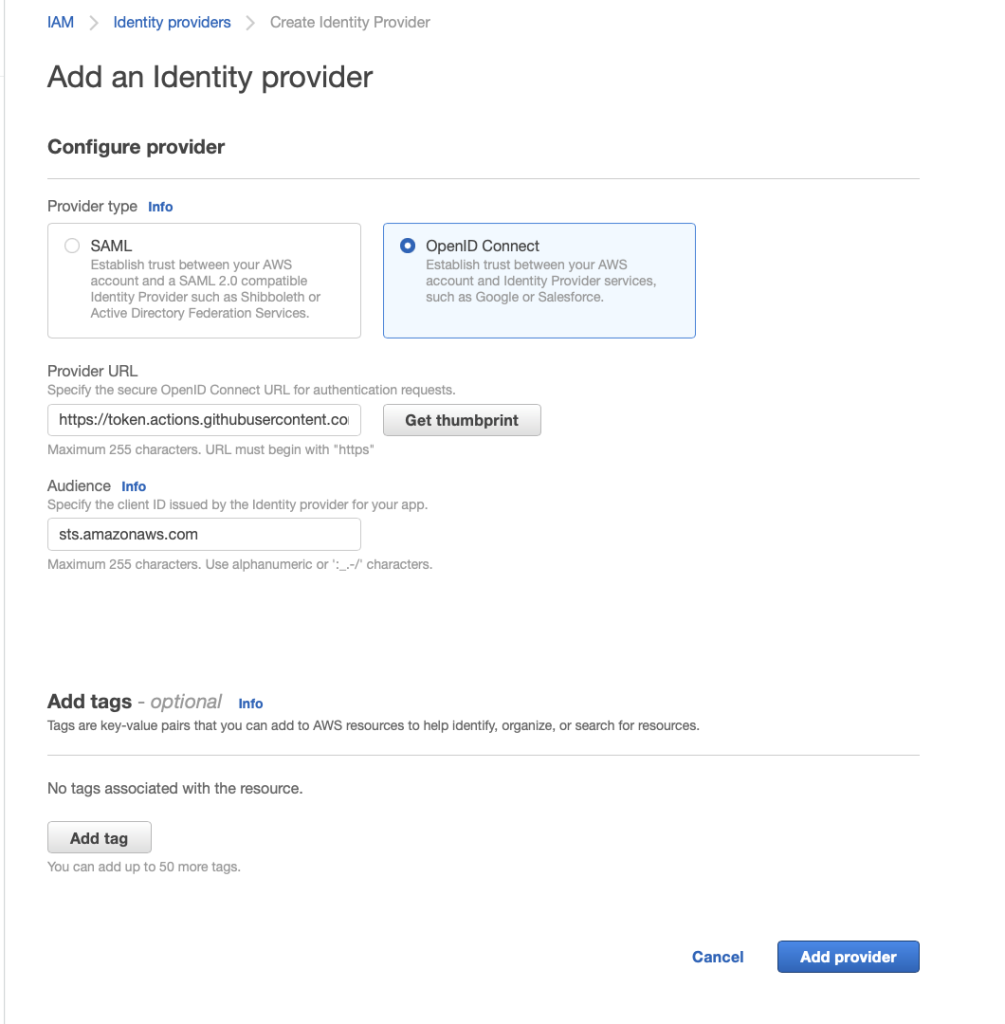
1. Add an identity provider in AWS
Adding this identity provider will allow STS to recognise and accept JWTs from GitHub Actions, but won’t allow GitHub Actions to assume any roles just yet.

2. Create a new role
Create a new role as per usual, but you want to edit the Trust Policy to allow the specific repository you want to assume the role.
{
	"Version": "2012-10-17",
	"Statement": [
		{
			"Effect": "Allow",
			"Principal": {
				"Federated": "arn:aws:iam::<account_id>:oidc-provider/token.actions.githubusercontent.com"
			},
			"Action": "sts:AssumeRoleWithWebIdentity",
			"Condition": {
				"StringLike": {
					"token.actions.githubusercontent.com:sub": "repo:<github_username>/<repo_name>:*"
				},
				"ForAllValues:StringEquals": {
					"token.actions.githubusercontent.com:aud": "sts.amazonaws.com",
					"token.actions.githubusercontent.com:iss": "https://token.actions.githubusercontent.com"
				}
			}
		}
	]
}
By hardening the Trust Policy, we can ensure that only the repository and the branch we want to assume the role can actually assume it.
3. Configure your Actions Workflow
You can use the below configuration as an example to configure your runner to use OIDC and assume the role.
name: 'demo-workflow'

on:
  push:
    branches:
      - main

permissions:
  # Allow the runner to use OIDC
  id-token: write
  contents: read

jobs:
  demo:
    name: 'demo-job'
    runs-on: ubuntu-latest
    environment: dev

  defaults:
    run:
      shell: bash

  steps:
    - name: Checkout
      uses: actions/checkout@v3

    # Assume our role using OIDC
    - name: Assume the role
      uses: aws-actions/configure-aws-credentials@v1
      with:
        role-to-assume: "<full_role_arn>"
        role-session-name: GitHubRunner
        aws-region: <your_aws_region>
Now, we should be able to validate that GitHub can successfully assume our role.

Congratulations!
Best Practices
I’ve shown you how you can configure GitHub Actions to assume roles in AWS using OIDC, but let’s look into some of the best practices for production-grade configuration.
- Read the official documentation is of course the ultimate source of truth for the best practices.
- Tighten the trust policy to the specific repository at least, but ideally restrict it to an environment and branch as well.
- Use separate roles for different repositories, this ensures that trust policies are always tightly scoped.
- Don’t configure a role with administrative access, if you need administrative access, first assume a web auth role, and then assume your admin role.
Remember, it’s not just GitHub!
Even though I’ve covered GitHub today, remember that more and more CI/CD platforms are supporting OIDC with AWS, so it’s important to check yours to make sure you’re set-up securely.
Final Notes
Well, I hope this article helped you to setup or even better, understand OIDC and what it’s actually doing under the hood.
Leave a Reply