
Let me share a few Ansible tips I’ve learned over the years and how you can use them to improve your playbooks. In particular, we’ll cover using:
- Ansible Collections
- Group and host variables
- Combining inventories
- The template module
- Creating dynamic roles
- Facts, parameters and blocks
- Further learning resources
Ansible Collections
When we learn about Ansible, we often jump straight to roles. Roles allow us to develop repeatable and accessible playbooks we can reuse for various purposes. Ansible Collections will enable us to group our roles, plugins, modules and relevant documentation under a namespace that makes integrating Galaxy into your Ansible workflows easier.
Galaxy and Automation Hub
A couple of years ago, Red Hat encountered a predicament with Galaxy and Roles. Roles are fantastic for building repeatable Ansible code. However, it’s difficult to group them, and what if you have two roles with the same name but are maintained entirely separately? Besides, how will we develop and maintain our roles? After a while, we could have hundreds of roles. Do we maintain each role individually and cause potential dependency problems, or do we group them by function, etc.?
This becomes more complicated when we require custom Ansible modules and plugins. Using Ansible locally isn’t an issue, but you’ll need to utilise Galaxy’s standards when you want to scale your Ansible usage and optimise your development workflows.
As mentioned above, a collection is a way to resolve this issue by grouping roles, modules, etc., into a namespace that you can use to refer to roles and modules.
Default Ansible Collections
There are a couple main collections you might’ve unknowingly used in the past, depending on how you used Ansible:
- ansible.builtin
- ansible.posix
These are collections that are usually built into Ansible, and you can reference them using ansible.builtin.module_name or ansible.posix.module_name or you may have referred to them simply as module name. You can browse additional collections on Ansible Galaxy or find more mainstream collections in the Ansible Docs and the relevant documentation to use them.
Building an Ansible Collection
Let’s start by building an ansible collection locally so we can better understand how it lets us organise our code. The Galaxy package will be automatically included when you install the Ansible package. So, let’s generate some collection boilerplate:
ansible-galaxy collection init my_name.my_namespaceThis command will create some generic collection boilerplate, which you can fill out with your code.
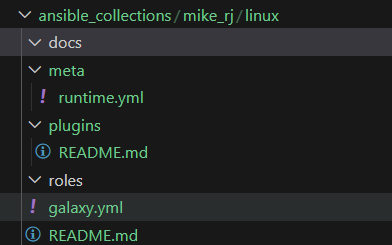
You can populate these folders with the relevant files and data, but here’s the gist of it:
- Docs is where you should write your documentation using the modules and roles stored within this collection.
- The Meta directory is for metadata, which can enable advanced usage of collections (refer to the link at the end of this section)
- Use the Plugins directory to store custom code such as Ansible modules.
- Any Ansible Roles should be placed in Roles.
- galaxy.yml is used for the collection metadata
- README.md is pretty self-explanatory
Downloading Ansible Collections
Now, once we have a collection uploaded to a repository, we can use Galaxy to download it somewhere Ansible can read it, and we can immediately use it. For Galaxy to download your collection like this, you must put the collection in its repository, and the collection should be at the root (the roles and plugins folders, etc., should be at the root of the repository.)
In your ansible project, create a requirements.yml file and populate it like so:
collections:
  # Download some public collections
  - name: community.general
    version: 7.4.0
  - name: amazon.aws
    version: 6.4.0
  - name: community.aws
    version: 6.3.0

 # Download our own collection
 - name: mike_rj.linux
   src: git+https://my_git_url
You can now download your collection using ansible galaxy:
ansible-galaxy install -r requirements.ymlInstalling roles and collections via Galaxy will also install it’s dependencies if you’ve configured those. You can learn more about using Ansible Galaxy in the Ansible Documentation.
Referencing Ansible Collections in our plays
We can now define our playbooks as usual, but instead of declaring roles, we can also declare collections. Generally, you’ll only reference one collection for your roles, and your roles will refer to other collections that provide the modules:
hosts: my_host_group
collections:
  - mike_rj.linux
roles:
  - nginx
Group and Host Variables
In many introductory Ansible courses they’ll teach you how to use inventory variables; the next level up is host and group variables, which allow you to define variables that apply to groups and hosts defined within your inventory in a separate location.
Where to place the variables
The group and host variables will be pulled from the host_vars and group_vars directories in the root of your Ansible project. Sub-directories can be created with the name of the host or host group, and YAML files inside those sub-directories can contain variables.
mkdir -p group_vars/my_group && mkdir host_vars/my_hostNested groups
In our inventories, we can create nested groups. Nested groups aren’t just a way to organise your groups and hosts but a very powerful tool for defining variable scope. When we define group variables for a group, it applies the variables across every subsequent group. Still, if we define the same variables for nested groups, those variables will override the parent group’s variables with the same name.
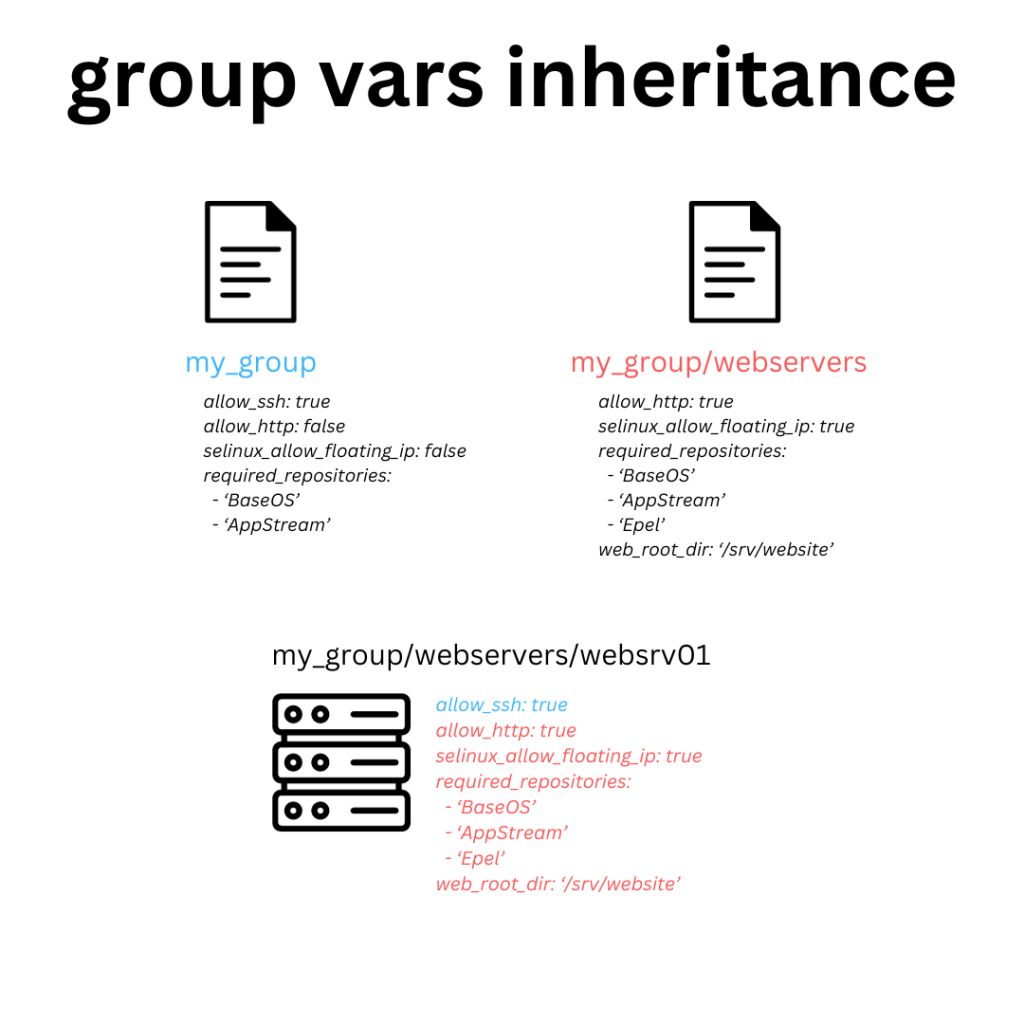
This gives you the power to manage variables hierarchically, defining sets of global variables for different categories such as region or datacentre and define tighter scope variables deeper within your inventory structure. As you can imagine, these provide you with more consistent configurations across your hosts and abstract variables from your inventory, allowing engineers to define variables but not the permission to modify the composition of your inventory itself, for example.
Defining the group variables
Let’s create some group vars, but first, create the inventory:
; hosts.ini
[my_group]
[my_group:children]
webservers
[webservers]
websrv01.lab.local
Now, let’s make our group vars:
# group_vars/my_group/standard.yml

allow_ssh: true
allow_http: fasle
selinux_allow_floating_ip: false
required_repositories:
  - "BaseOS"
  - "AppStream"
# group_vars/webservers/standard.yml
allow_http: true
selinux_allow_floating_ip: true
required_repositories:
- "BaseOS"
- "AppStream"# group_vars/webservers/nginx.yml
web_root_dir: "/srv/website"As you can see, we’ve split the group variables into files that allow us to organise our variables; for example, we can override my_group/standard.yml in webservers/standard.yml; the names of the files don’t matter; it’s just a way to organise variables.
Combining Inventories
A key feature required to use Ansible in a scalable manner is dynamic inventories, which are scripts that pull data dynamically from external sources such as APIs and pass the information to Ansible, allowing you to retrieve a dynamic inventory of hosts from an API every time you run your playbook.
One issue you may encounter is organising the data from your dynamic inventory in a way that’s unique to your environment or doesn’t overcomplicate your host expressions. For example, you may want EC2 instances with a particular tag AND that reside within a specific availability zone to be assigned to a static inventory group to which you can assign variables.
Creating the dynamic inventory
Let’s create a dynamic inventory to capture all of our EC2 instances in our account:
# dynamic.aws_ec2.yml

plugin: amazon.aws.aws_ec2
regions:
  - ap-southeast-2
  - us-west-2
keyed_groups:
  - prefix: tag
    key: tags
  - prefix: aws_region
    key: placement.region
This inventory will look for instances across the ap-southeast-2 and us-west-2 regions and create groups for:
- Each instance will be in a group called tag_{tag_name} for each tag applied to it.
- Each instance will be in a group associated with it’s region called region_{region_name}.
Associating dynamic groups with static groups
We can associate dynamic inventory groups, such as tags and regions, with static inventory groups, which helps us organise our dynamic inventory values into groups that make sense.
; static_groups_inv.ini

[region_ap_southeast-2]
[region_us-west-2]
[tag_application_server]
[tag_database_server]

[primary_region]
[secondary_region]
[application_servers]
[database_servers]

[primary_region:children]
region_ap-southeast-2

[secondary_region:children]
region_us-west-2

[application_servers:children]
tag_application_server

[database_servers:children]
tag_database_server
By combining static and dynamic inventories, you can make ansible administration easier by abstracting the complexity of the data structure returned by the dynamic inventory and associating it with groups that are meaningful to the system administrators.
The Template Module
The template module is one of the most potent modules Ansible provides us with and has many use cases that might not be immediately apparent.
I recommend using the template module whenever you can copy a text file to a remote system with configurable values. This could be a configuration file, a systemd unit file, or any other text file type. The template module allows you to reference variables using the full power of the Jinja2 templating engine.
Understanding Jinja2
inja2 has a lot of functionality that I won’t discuss here, but I want to cover the basics so you can use the template module to make your life easier. Here’s an example template of a systemd unit we can use to run our rootless containers using Podman:
# Deployed via Ansible on {{ ansible_date_time.date }} - any changes made to this file will be overwritten.

[Unit]
Description=Podman container {{ container_description }}
Wants=network-online.target
After=network-online.target
RequiresMountsFor=/var/run/container/storage

[Service]
Restart={{ container_restart_policy }}
ExecStart=/usr/bin/podman start {{ container_id }}
ExecStop=/usr/bin/podman stop -t 1 {{ container_id }}
KillMode=none
Type=forking
PIDFile=/run/user/1000/overlay-containers/{{ container_id }}/userdata/conmon.pid

[Install]
WantedBy=default.target
This example unit is taken from the Podman documentation and written as a template. Hopefully, you can see how we can create more dynamic files using templates.
Let’s demonstrate a for loop in an example sysctl configuration file:
{% for variable in sysctl_network_controls %}
{{ variable.key }}={{ variable.value }}
{% endfor %}
This will allow us to pass a dictionary called sysctl_network_controls, the template module can iterate over the keys and values in the dictionary and put them in the template for us.
Now, let’s use some if/else logic to enable us to turn off privileged ports to prevent someone from overriding the value with a sysctl variable:
{% for variable in sysctl_network_controls %}
{% if disable_privileged_ports -%}
{% if variable.key is not 'net.ipv4.ip_unprivileged_port_start' -%}
{{ variable.key }}={{ variable.value }}
{% endif -%}
{% else %}
{{ variable.key }}={{ variable.value }}
{% endif %}
{% endfor %}
{% if disable_privileged_ports %}
net.ipv4.ip_unprivileged_port_start=0
{% endif %}
Now, we’ve added some additional logic that allows us to define disable_privileged_ports, and if specified, we can prevent someone potentially breaking our configuration!
Calling the template module
If we’re using our template module inside a role, we can put our template in the templates directory and reference it by name; otherwise, we will need to give Ansible a file path to the template.
Let’s call it in some tasks:
# My template tasks
- name: Create systemd module for rootless podman container
  ansible.builtin.template:
    src: podman.service.j2
    dest: /home/{{ runas_user }}/.config/systemd/user/{{ container_name }}.service
    owner: "{{ runas_user }}"
    mode: 0640
    backup: yes # Create temporary backup of existing file in-case we need to roll-back during deployment.

- name: Create sysctl.conf file for network controls
  ansible.builtin.template:
    src: sysctl.conf.j2
    dest: /etc/sysctl.d/network_controls.conf
    owner: root
    group: root
    mode: 0640
    backup: yes
  become: yes # Because we're writing a file to a privileged location.
To pass the template, all we need to do is call the built-in template module, which will also allow us to define some additional parameters to tell Ansible how to place the template on the remote system, such as file mode, SELinux context, and even an optional validation command we can use to validate the template is syntactically on the system.
Making Your Roles Dynamic
One of the most essential requirements an ansible role should meet is the ability to be generic, configured via variables and adaptable. You should be able to deploy your role onto various systems, and it should be able to adapt accordingly. If it’s not supported, your role should realise this and cancel its execution.
Conditionally omitting values
When building roles, we want our roles to be able to fit a variety of different configurations; instead of creating a set of tasks per configuration, we can use one task and adapt it for different configurations by using the default filter.
# example task
- name: Download a package from the internet
  ansible.builtin.get_url:
    url: "{{ file.url }}"
    dest: "{{ file.destination }}"
    checksum: "{{ file.checksum | default(omit) }}"
    url_usersame: "{{ file.web_auth_user | default(omit) }}"
    url_password: "{{ file.web_auth_pass | default(omit) }}"
    mode: "{{ file.mode | default(0555) }}"
In the above example, we’ve created a generic task to fetch a package from the internet. We can use one task to support unauthenticated and authenticated downloads and support for optional checksum validation. Using one task, we can support multiple configuration options, and if one of those variables (such as file.web_auth_user) isn’t defined, Ansible will omit the parameter from the task.
Using Ansible Facts
You might want to build a role for multiple Linux distributions or operating systems. When creating dynamic roles, you must use the facts available to determine how the role should operate. We have the option to define static variables in our role under /vars. This is an excellent opportunity to define some distribution or operating system-specific variables we can import conditionally.
# Import variables based on the distribution
- include_vars: "{{ item }}"
  with_first_round:
    - "{{ ansible_distribution | lower }}.yml"
You can, of course, define multiple items here that you want to import; for example – you may want to import one set of variables for the distribution (e.g. RHEL or Ubuntu) and then another set of variables for the version (e.g. RHEL 7.x or Ubuntu 22.x). This method allows you to build roles that support multiple operating systems, distributions and even versions by defining static variable files for each supported configuration and importing them dynamically.
Importing and looping tasks
Writing complex playbooks is excellent until it becomes long and hard to manage. As your roles become more advanced, there might be a couple of things that come to your mind:
- Splitting up your tasks into multiple play files
- Conditionally running sets of tasks based on facts or variables
- Looping over a set of tasks
I’ll combine these in one example so you can see them in action:
# Example of conditionally referencing and looping sets of tasks

- name: Perform bootstrap on Ubuntu
  include_tasks: bootstrap_ubuntu.yml #tasks/bootstrap_ubuntu.yml
  when: ansible_distribution == 'Ubuntu'

- name: Perform bootstrap on RHEL
  include_tasks: bootstrap_rhel.yml #tasks/bootstrap_redhat.yml
  when: ansible_distribution == 'RedHat'

- name: Deploy Applications
  include_tasks: application.yml #tasks/application.yml
  loop: "{{ applications }}"
  loop_control:
    loop_var: application # allows us to reference the current loop as application.
Combining this with the other strategies in this section can make for powerful and dynamic roles that can perform complex activities but split the code into easy-to-read chunks.
Facts, parameters and secrets
Modern environments can be pretty complex; many systems, such as IPAMs, CMBDs, and Monitoring systems, often need to collaborate and exchange information. Maybe you must also register licenses in a portal. You could create variables in your group_vars for these or use Ansible Vault, but that’s discouraged because it separates the value that Ansible pulls from the source of truth (where the value is configured).
Remote parameters and secrets
One of the powers of Ansible is the ability to make API calls or fetch remote data from external sources and reference them in your task. For example, your database password from AWS Secrets Manager or retrieving infrastructure details from AWS Parameter Store:
# Example using values from SSM parameter store
- name: Add internal YUM repository
  ansible.builtin.yum_repository:
    name: internal
    description: Internal YUM repository
    baseurl: "https://{{ lookup('amazon.aws.aws_ssm', 'repo_server_url') }}/$releasever/$basearch/" # lookup the repo server URL from an SSM parameter.
Blocks
Blocks are a convenient feature for building dynamic roles because they allow you to group related tasks, wrap conditions around them and perform specific actions upon execution or failure of one of the tasks. A good example would be deploying an application; perhaps you’ll wrap the configuration deployment tasks in a block and perform a test. If the test fails, you can have a catch-all at the end of the block that rolls back the configuration update. You could also specify an action to clean up the old configuration if the new configuration was applied and tested successfully.
Here’s an example of using a block for this purpose exactly:
# Example of using blocks
- name: Apply new configuration
  block:
    - name: Update nginx.conf
      ansible.builtin.template:
        src: nginx.conf.j2
        dest: /etc/nginx/nginx.conf
        mode: 0644
        backup: yes
      register: nginx_config

    - name: Test configuration
      ansible.builtin.command: nginx -t

 rescue:
   - name: Restore nginx.conf
     ansible.builtin.file:
       path: "{{ nginx_config.backup_file }}"
       dest: /etc/nginx/nginx.conf
       mode: 0644

 always:
   - meta: flush_handlers # reload nginx

 when:
   - 'load_balancer' in group_names
As you can see, this allows you to create powerful roles that can automatically remediate issues discovered during deployments and add conditionals to code groups.
Further Learning Resources
I didn’t cover everything in this blog post; I wanted to cover a lot more, such as writing your ansible modules – but these topics will require their blog posts. Some ideas for further learning are:
- Reading through the Ansible Documentation, which is an excellent training resource.
- Red Hat offers an Ansible Course (DO294), which will prep you for the RHCE, but unfortunately, isn’t as complex with Ansible as this blog post most likely.
Leave a Reply